- Download current version of ZebraDesigner driver
- Go to “Printers and Scanners” under “System Settings” or “Devices and Printers” from the “Control Panel”, click “Add a printer”, and select “The printer that I want isn’t listed”.
- Select “Add a printer using a TCP/IP address or hostname” and click “Next”
- Type the IP address for your printer in the “Hostname or IP address” field and click “Next”
- Make sure that the box next to “Query the printer and automatically select the driver to use” is NOT checked
- Make sure “Generic Network Card” is selected under “Device Type” and click “Next”
- Scroll down in the “Manufacturer” box and select “ZDesigner”
- Scroll down in the “Printers” box, select the correct driver for your printer, and click “Next”. Make sure that the model matches your specific printer and that the driver selected is the most current version
- Type in a name for this printer and click “Next”
- Make sure “Do no share this printer” is selected and click “Next”
- Make sure “Set as the default printer” is NOT selected and click “Finish”
Update “Printer Properties” to correct label size
- Go to “Printers and Scanners” under “System Settings” or “Devices and Printers” from the “Control Panel”
- Right-click on the printer and select “Printing Preferences”
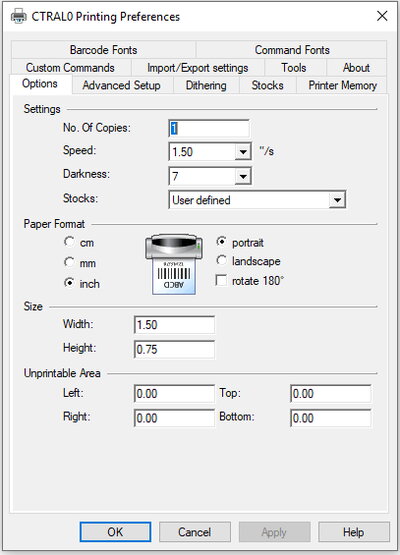
- If you are using a TLP 3842 model printer, make sure the data fields are updated to the following and click “OK”:
Image
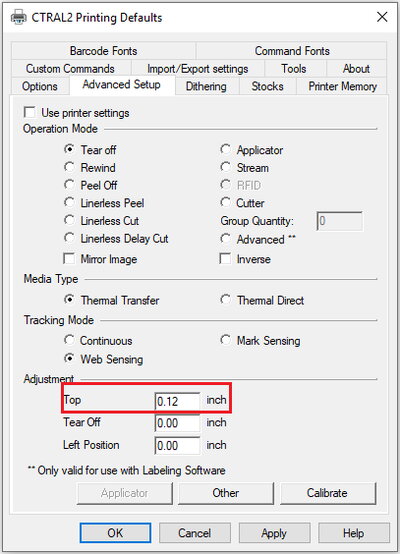
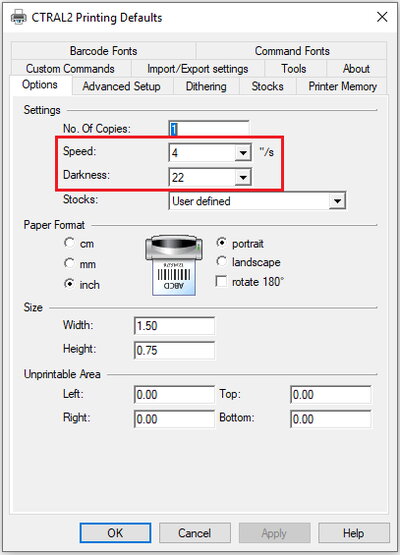
- If you are using a GX430t model printer, make sure the data fields are updated to the following and click "Ok". The default "Darkness" setting will be too light so make sure you update the value to '22' and update the "Speed" to '4'. You will also need to click on the "Advanced Setup" tab and update the "Top" field to "0.12":
Image
Image