Printing Chemical Inventory Labels Installing Printer Instructions (for PC) Label Printer Information
Printing Chemical Inventory Labels
Printer Locations
Printers for making labels are networked and can be accessed from any computer connected to the SCS network. They are mounted near the elevators on every floor in RAL South and CLSL-A. See the instructions in Installing Label Printers (for PC) for configuring a computer to print to one of these printers. If you need assistance, contact SCS Inventory.
Deciphering Labels
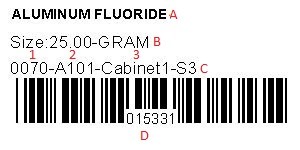
- This is the material name as it appears in the database. If the material name is too long, it will end up getting cut off.
- The size on the label corresponds to the amount of material originally in the container when it was purchased.
- This is the location where the chemical should be stored. There are three components to the description:
- Building code: This is the 4-digit code that corresponds to the building where the chemical is stored. The list of building codes can be found here
- Room number
- Location description: This identifies where in the room the chemical is stored (bench, cabinet, freezer, etc.). There may also be sub-locations listed for a location (shelf in freezer, bin in cabinet, etc.).
- This is the barcode ID. It will be used to track the location of its container and can be entered into the database to look up any necessary information about the container itself, the chemical data, or the SDS information.
Installing Printer Instructions (for PC)
- Download current version of ZebraDesigner driver
- Go to “Printers and Scanners” under “System Settings” or “Devices and Printers” from the “Control Panel”, click “Add a printer”, and select “The printer that I want isn’t listed”.
- Select “Add a printer using a TCP/IP address or hostname” and click “Next”
- Type the IP address for your printer in the “Hostname or IP address” field and click “Next”
- Make sure that the box next to “Query the printer and automatically select the driver to use” is NOT checked
- Make sure “Generic Network Card” is selected under “Device Type” and click “Next”
- Scroll down in the “Manufacturer” box and select “ZDesigner”
- Scroll down in the “Printers” box, select the correct driver for your printer, and click “Next”. Make sure that the model matches your specific printer and that the driver selected is the most current version
- Type in a name for this printer and click “Next”
- Make sure “Do not share this printer” is selected and click “Next”
- Make sure “Set as the default printer” is NOT selected and click “Finish”
Update “Printer Properties” to correct label size
- Go to “Printers and Scanners” under “System Settings” or “Devices and Printers” from the “Control Panel”
- Right-click on the printer and select “Printing Preferences”
- If you are using a TLP 3842 model printer, make sure the data fields are updated to the following and click “OK”:
Image
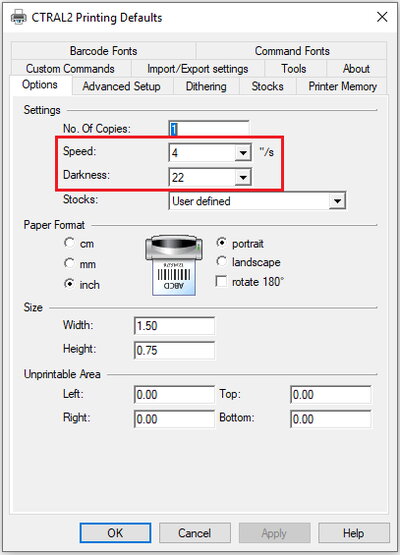
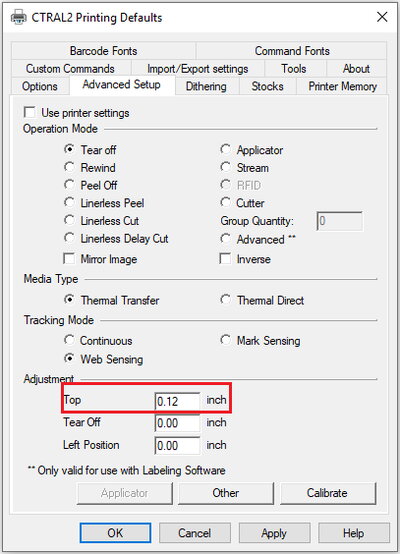
- If you are using a GX430t model printer, make sure the data fields are updated to the following and click "Ok". The default "Darkness" setting will be too light so make sure you update the value to '22' and update the "Speed" to '4'. You will also need to click on the "Advanced Setup" tab and update the "Top" field to "0.12":
Image
Image
Label Printer Information
| Printer location | Printer Name | IP Address |
| CLSL-A 1st floor | CTCLSL1 | 192.17.84.91 |
| CLSL-A 2nd floor | CTCLSL2 | 192.17.84.92 |
| CLSL-A 3rd floor | CTCLSL3 | 192.17.84.93 |
| CLSL-A 4th floor | CTCLSL4 | 192.17.84.94 |
| CLSL-A 5th floor | CTCLSL5 | 192.17.84.253 |
| RAL Ground floor | CTRAL0 | 192.17.29.85 |
| RAL 1st floor | CTRAL1 | 192.17.29.86 |
| RAL 2nd floor | CTRAL2 | 192.17.29.87 |
| RAL 3rd floor | CTRAL3 | 192.17.29.88 |
| RAL 4th floor | CTRAL4 | 192.17.29.89 |
| DAV Kong Lab | CTDAV | 130.126.228.213 |